What I do

This Blog discusses my journey as a local bassist. I talk about all things bass, gigs, writing and recording, gear, and the perpetual search for that "tone."


Navigation

Wednesday, February 27, 2019

Elevating Speaker Cabinets

"I can't hear myself."  It's a common complaint from guitarists and a bassists.  The infamous volume wars have their root in this statement.  I struggled to hear myself for years until I employed a simple fix by building a cabinet stand to get my cabinets up off of the floor and closer to ear level.  This has made a huge difference in not only being able to hear myself as well as the over volume levels both at rehearsals and on stage.


I looked at designs and methods employed by other bassists.  In this respect guitarists have it easier in that there are stands readily available to use that can support the weight of the typical guitar combo.  Bass rigs on the other hand are usually too heavy to employ the typical guitar cabinet stands.  This usually requires unusual approaches utilizing everything from appropriated coffee tables, milk crates and folding work stations, to custom purpose-built stands.  I tried a few different approaches before landing on building my own cabinet stand.  I drew heavily from this gentleman's design from a popular bass forum.


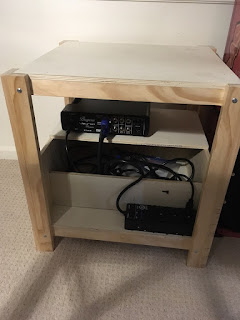
I liked this approach and did something similar.  My stand incorporated a storage area for cords and has a shelf where the Burgera Veryon M BV1001M bass amp is mounted.  I also mounted my Furman Power Strip on the stand as well.  I like being able to have everything in one place rather than coiling up cords and cables to put in a separate carrying case.  This arrangement saves time on load-in and load-out as well as set-up and tear-down.  I have only used this for the past three shows but for the most part I do like it. 

There are a few things I will change on the next build (yes there will be another version) to make this work a little better.  Plugging in the extension cord for my pedal board in the dark on the back of the stand which is usually pushed up against a wall is a little more challenging.  I think the next rendition will have the power strip on the front of the stand.  Another feature I have found myself contemplating is a set of fixed wheels on one set of legs (probably the side as opposed to the front or back) to make the stand easier to move around.  Lastly I would like the stand to be a little taller so that the platform of the stand would be at about waist level.  Okay I lied - lastly I will paint the next stand.  


Wednesday, February 13, 2019

Thumb Rests


I have been thinking about thumb rests and ramps for quite some time now.  I had read about bassists using these and it always seemed to make sense to me.  After weeks of intending to build a set and try them out for awhile I finally got around to fabricating a set of thumb rests out of some scrap wood this morning.


So what is the purpose of adding a piece of wood to the top of an otherwise perfect condition bass?  For those of us who play with our fingers we frequently find ourselves anchoring our thumbs on the top side of one of the pickups.  I tend to play all over the length of the open space between the end of the fret board and the bridge of the bass.  By adding thumb rests this gives me a broader anchor point for my thumb as my right hand moves the length of the distance from the fret board to the bridge.  It will also hopefully help me establish a little more consistency of attack on my B string.  Having played for a number of years using the floating thumb technique and having established a good foundational technique I felt it would be okay to experiment with the thumb rests.


I temporarily affixed the thumb rests to the top of the bass using Command Strips so that they can be easy removed without damaging the finish on my bass.  The thumb rests bridge the space between the neck pick up and the end of the fret board and the space between the neck pickup and bridge pickup.  I used a sander to round over the top edge of each thumb rest.  Just for kicks I stained them using some leftover stain we had laying around from a previous project.


So I will try them out for the next week or so and report back on my observations.  If I find that I really like them then I will make another set out of some very old oak we discovered while renovating our drummer's garage to convert it to a rehearsal space.  I will have to give serious consideration to attaching them with stainless steel wood screws if this is the route I decide to go.

Tuesday, February 5, 2019

Intonation


I started out playing piano and studied privately for ten years.  I played trombone starting in fifth grade all the way through college.  I think perhaps these two things contributed to my obsession with intonation and tuning.

In my mind it is inexcusable to be out of tune or not properly intonated.  With the widespread availability and affordability of quality tuners proper intonation and tuning are easily achieved.  Nothing quite says "amateur" like a band out of tune or guitars improperly intonated.

Tuning is pretty straightforward and most of us can handle this.  The problem arises when tuning is not checked frequently.  Personally I check my tuning between every song when playing live and during any break during rehearsals.


Intonation is a little more challenging on the front end but once you understand the basics anyone can do it. I begin by getting each string in tune then I tackle intonation. By fretting the twelfth fret I look at the tuner to see if it is sharp or flat.  If the fretted twelfth fret is sharp then the bridge saddle needs to move back toward the tail of the bass.  By moving the saddle toward the tail of the bass you are lengthening the distance from the saddle to the twelfth fret thereby bringing the fretted string back into tune.  By doing so this then makes the open string flat so tune the open string again.  This is a back and forth process to bring both the open string and the fretted string at the twelfth fret into tune.  Naturally if the fretted twelfth fret is flat then the saddle needs to move forward toward the head stock of the bass and again the tuning of the open string and fretted twelfth fret is performed until both the open string and the twelfth fret are in tune.


Once the strings are intonated I play my bass for a day or two and double check the tuning and intonation.  When I am satisfied that both the tuning and intonation are perfect I reference the strings at both the nut and the saddles.  This is a crucial step many people overlook when installing new strings.  Referencing is done by pushing down on the strings just before the nut and just before where they enter the saddles on the bridge.  This helps the strings stay in tune and is something I truly wish someone had shown me years ago.